SpringBoot 2 Maven 新建多模块项目配置方法 home 编辑时间 2020/04/20  ## 前言 通常`SpringBoot`新建项目,默认是集成了`Maven`,然后所有内容都在一个主模块中。 如果项目架构稍微复杂一点,就需要用到`Maven`多模块。 本文简单概述一下,新建一个`SpringBoot Maven` 多模块项目的流程。 具体内容还需要参考你具体的项目中的实际需求, 我这里只按照大多数通常的情况为准创建一个基础款`demo`。 另外模块都只基于`Maven`的默认模板进行创建, 需要`SpringBoot`是用手动新建文件的方式来实现。 环境: - `Java` 1.8 - `IntelliJ IDEA` 2020.01 - `Maven` 3.3.9 - `SpringBoot` 2.2.6.RELEASE - `Mybatis Plus` 3.3.1 ## 折腾 ### 第一步 新建一个maven项目 1 新建项目 `Create New Project` 2 选择Maven 然后直接下一步  3 根据需要修改配置,然后Finish即可 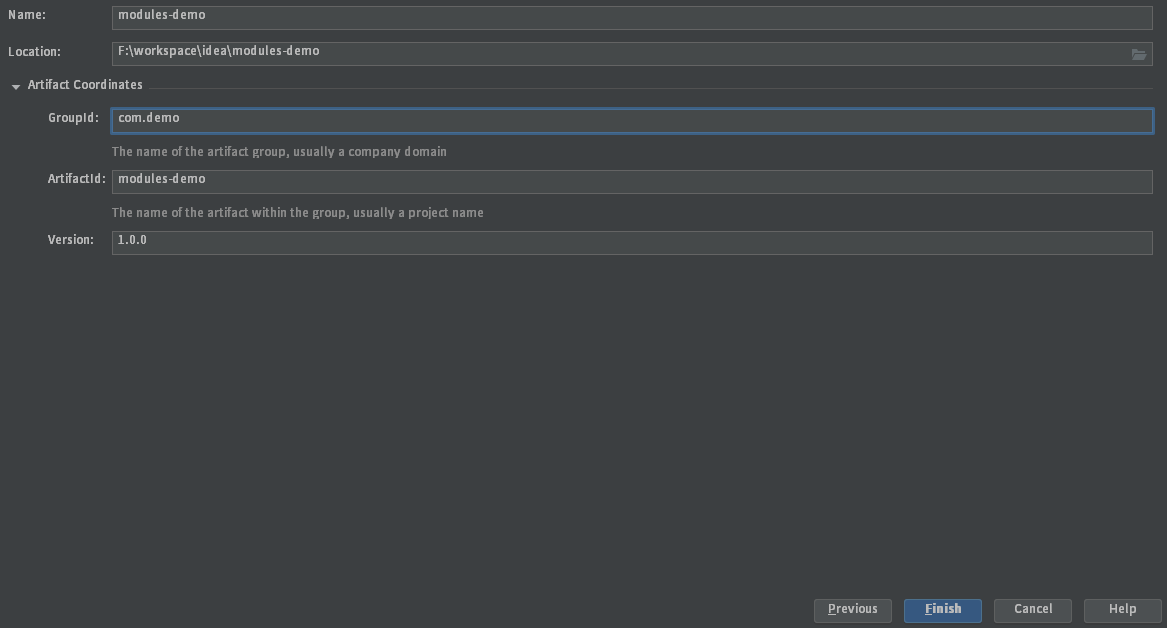 4 直接删除不需要的文件夹和文件,如 `src文件夹`  <br> ### 第二步 新建子模块 `右击项目` -> `New` -> `Module` 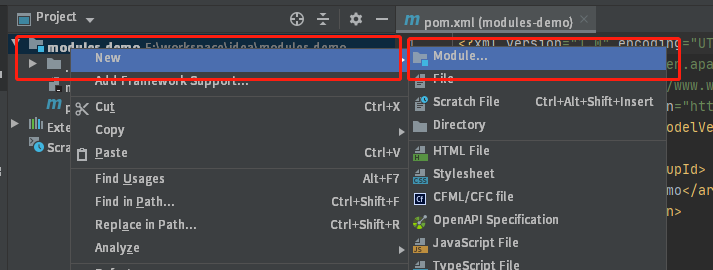 同样选择Maven 直接下一步 完成 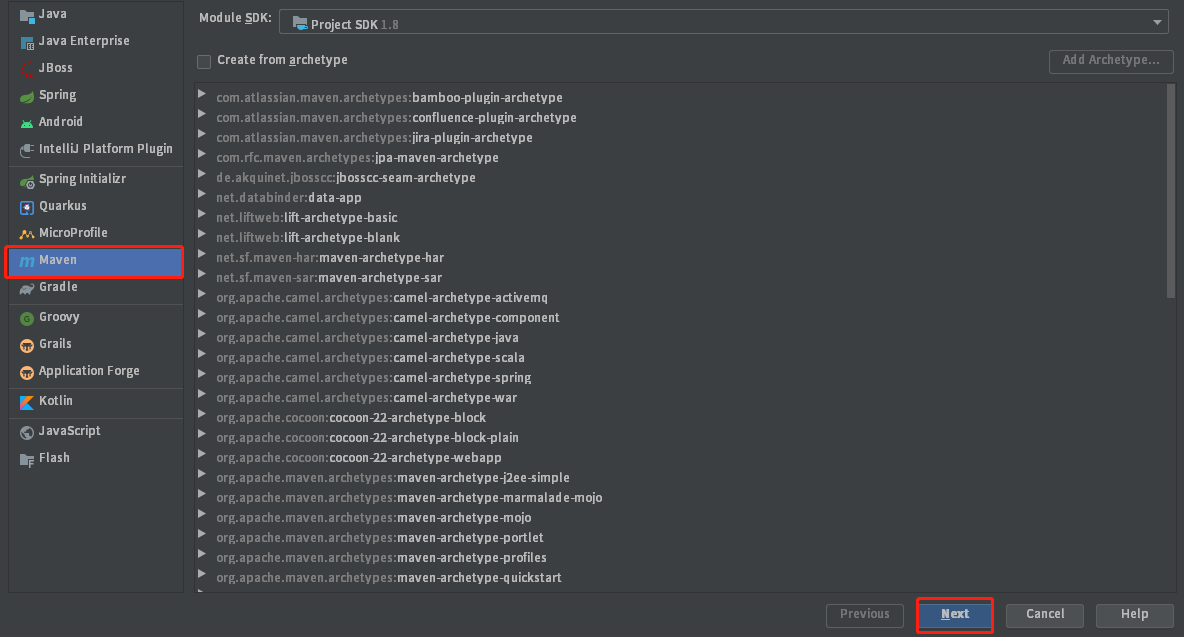  重复以上步骤,建立所有需要的子模块 并删除不需要的文件或文件夹 例如`test`文件夹 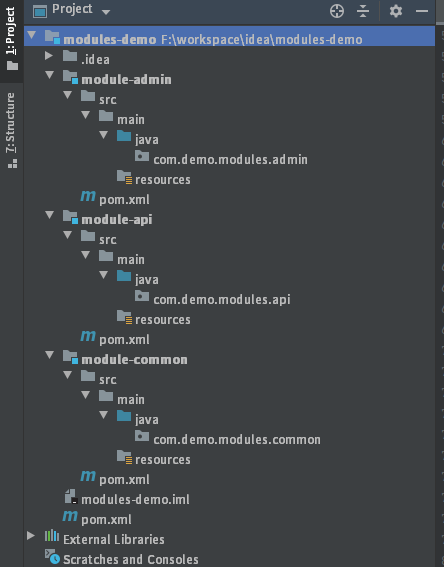 <br> ### 第三步 配置`Maven` **主项目 `pom.xml`** ```xml <?xml version="1.0" encoding="UTF-8"?> <project xmlns="http://maven.apache.org/POM/4.0.0" xmlns:xsi="http://www.w3.org/2001/XMLSchema-instance" xsi:schemaLocation="http://maven.apache.org/POM/4.0.0 http://maven.apache.org/xsd/maven-4.0.0.xsd"> <modelVersion>4.0.0</modelVersion> <groupId>com.demo</groupId> <artifactId>modules-demo</artifactId> <packaging>pom</packaging> <version>1.0.0</version> <name>modules-demo</name> <parent> <groupId>org.springframework.boot</groupId> <artifactId>spring-boot-starter-parent</artifactId> <version>2.2.6.RELEASE</version> </parent> <modules> <module>module-api</module> <module>module-admin</module> <module>module-common</module> </modules> <properties> <project.build.sourceEncoding>UTF-8</project.build.sourceEncoding> <project.reporting.outputEncoding>UTF-8</project.reporting.outputEncoding> <java.version>1.8</java.version> <mysql.version>8.0.19</mysql.version> <fastjson.version>1.2.68</fastjson.version> <mybatisplus.spring.boot.version>3.3.1</mybatisplus.spring.boot.version> <mybatisplus.generator.version>3.3.1</mybatisplus.generator.version> <freemarker.version>2.3.30</freemarker.version> </properties> <dependencies> <dependency> <groupId>org.springframework.boot</groupId> <artifactId>spring-boot-starter-test</artifactId> <scope>test</scope> </dependency> <dependency> <groupId>org.springframework.boot</groupId> <artifactId>spring-boot-starter-web</artifactId> </dependency> <dependency> <groupId>org.springframework.boot</groupId> <artifactId>spring-boot-starter-aop</artifactId> </dependency> <dependency> <groupId>org.springframework</groupId> <artifactId>spring-context-support</artifactId> </dependency> <dependency> <groupId>org.springframework.boot</groupId> <artifactId>spring-boot-starter-data-redis</artifactId> </dependency> <dependency> <groupId>org.springframework.boot</groupId> <artifactId>spring-boot-configuration-processor</artifactId> <optional>true</optional> </dependency> <dependency> <groupId>mysql</groupId> <artifactId>mysql-connector-java</artifactId> <version>${mysql.version}</version> </dependency> <dependency> <groupId>com.alibaba</groupId> <artifactId>fastjson</artifactId> <version>${fastjson.version}</version> </dependency> <dependency> <groupId>com.baomidou</groupId> <artifactId>mybatis-plus-boot-starter</artifactId> <version>${mybatisplus.spring.boot.version}</version> </dependency> <dependency> <groupId>com.baomidou</groupId> <artifactId>mybatis-plus-generator</artifactId> <version>${mybatisplus.generator.version}</version> </dependency> <dependency> <groupId>org.freemarker</groupId> <artifactId>freemarker</artifactId> <version>${freemarker.version}</version> </dependency> </dependencies> <repositories> <repository> <id>public</id> <name>aliyun nexus</name> <url>http://maven.aliyun.com/nexus/content/groups/public/</url> <releases> <enabled>true</enabled> </releases> </repository> </repositories> <pluginRepositories> <pluginRepository> <id>public</id> <name>aliyun nexus</name> <url>http://maven.aliyun.com/nexus/content/groups/public/</url> <releases> <enabled>true</enabled> </releases> <snapshots> <enabled>false</enabled> </snapshots> </pluginRepository> </pluginRepositories> </project> ``` **工具性质 子项目 `pom.xml`** ```xml <?xml version="1.0" encoding="UTF-8"?> <project xmlns="http://maven.apache.org/POM/4.0.0" xmlns:xsi="http://www.w3.org/2001/XMLSchema-instance" xsi:schemaLocation="http://maven.apache.org/POM/4.0.0 http://maven.apache.org/xsd/maven-4.0.0.xsd"> <parent> <artifactId>modules-demo</artifactId> <groupId>com.demo</groupId> <version>1.0.0</version> </parent> <modelVersion>4.0.0</modelVersion> <artifactId>module-common</artifactId> <packaging>jar</packaging> <build> <finalName>${project.artifactId}</finalName> </build> </project> ``` **接口性质 子项目 `pom.xml`** ```xml <?xml version="1.0" encoding="UTF-8"?> <project xmlns="http://maven.apache.org/POM/4.0.0" xmlns:xsi="http://www.w3.org/2001/XMLSchema-instance" xsi:schemaLocation="http://maven.apache.org/POM/4.0.0 http://maven.apache.org/xsd/maven-4.0.0.xsd"> <parent> <artifactId>modules-demo</artifactId> <groupId>com.demo</groupId> <version>1.0.0</version> </parent> <modelVersion>4.0.0</modelVersion> <artifactId>module-admin</artifactId> <build> <finalName>${project.artifactId}</finalName> <plugins> <plugin> <groupId>org.springframework.boot</groupId> <artifactId>spring-boot-maven-plugin</artifactId> </plugin> <plugin> <groupId>org.apache.maven.plugins</groupId> <artifactId>maven-surefire-plugin</artifactId> <configuration> <skipTests>true</skipTests> </configuration> </plugin> </plugins> </build> </project> ``` 打包时,工具类的会先生成`jar`包,并引入到接口类中,接口类再生成`war`包,可以放`Tomcat`下运行 <br> ### 第四步 配置`SrpingBoot` **接口类加入启动类和配置文件** 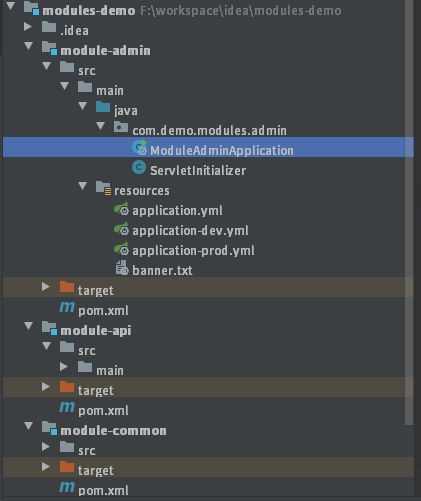 **手动创建启动类** **`ModuleAdminApplication.java`** ```java package com.demo.modules.admin; import org.mybatis.spring.annotation.MapperScan; import org.springframework.boot.SpringApplication; import org.springframework.boot.autoconfigure.SpringBootApplication; @SpringBootApplication @MapperScan(basePackages = "com.demo.modules.admin.mapper") public class ModuleAdminApplication { public static void main(String[] args) { SpringApplication.run(com.demo.modules.admin.ModuleAdminApplication.class, args); } } ``` **`ServletInitializer.java`** ```java package com.demo.modules.admin; import org.springframework.boot.builder.SpringApplicationBuilder; import org.springframework.boot.web.servlet.support.SpringBootServletInitializer; public class ServletInitializer extends SpringBootServletInitializer { @Override protected SpringApplicationBuilder configure(SpringApplicationBuilder application) { return application.sources(ModuleAdminApplication.class); } } ``` **配置文件** **`application.yml`** ```shell spring: profiles: active: dev jackson: time-zone: GMT+8 serialization: write-dates-as-timestamps: true ``` **`application-dev.yml`** ```shell # 开发环境 server: port: 10000 servlet: context-path: /modules/admin/dev spring: servlet: multipart: max-file-size: 100MB max-request-size: 100MB datasource: driver-class-name: com.mysql.cj.jdbc.Driver url: jdbc:mysql://localhost:3306/modules?allowMultiQueries=true&useUnicode=true&characterEncoding=UTF-8&useSSL=false&serverTimezone=Asia/Shanghai username: root password: root redis: database: 9 mybatis-plus: mapper-locations: classpath*:/mapper/*.xml type-aliases-package: com.demo.modules.admin.serivce global-config: db-config: id-type: auto logic-delete-value: 1 logic-not-delete-value: 0 insert-strategy: not_null update-strategy: not_null select-strategy: not_null banner: false configuration: map-underscore-to-camel-case: true cache-enabled: true call-setters-on-nulls: true logging: file: logs/modules.admin.dev.log level.com: debug ``` **`application-prod.yml`** ```shell # 生产环境 server: port: 10000 servlet: context-path: /modules/admin/prod spring: jmx: enabled: false servlet: multipart: max-file-size: 20MB max-request-size: 20MB datasource: driver-class-name: com.mysql.cj.jdbc.Driver url: jdbc:mysql://mysql:3306/modules?allowMultiQueries=true&useUnicode=true&characterEncoding=UTF-8&useSSL=false&serverTimezone=Asia/Shanghai username: root password: root redis: database: 10 host: redis port: 6379 timeout: 15s jedis: pool: max-active: 1000 max-wait: -1ms min-idle: 4 max-idle: 20 mybatis-plus: mapper-locations: classpath*:/mapper/*.xml type-aliases-package: com.demo.modules.admin.serivce global-config: db-config: id-type: auto logic-delete-value: 1 logic-not-delete-value: 0 insert-strategy: not_null update-strategy: not_null select-strategy: not_null banner: false configuration: map-underscore-to-camel-case: true cache-enabled: true call-setters-on-nulls: true logging: file: logs/modules.admin.prod.log level.com: warn ``` <br> ### 第五步 `Maven` 打包生成`war` 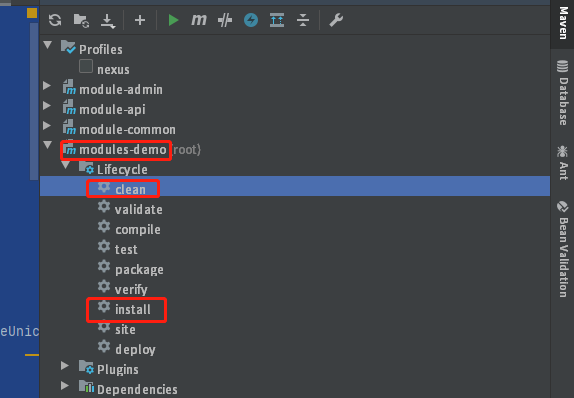 直接用`Idea`自带的可视化即可。 先去`settings`中配置好`maven`目录 在Maven面板中找到根项目, 选择`clean` 再选择`install` 大功告成! ## END 最终效果 Gitee: [https://gitee.com/tczmh/modules-demo](https://gitee.com/tczmh/modules-demo) 送人玫瑰,手留余香 赞赏 Wechat Pay Alipay Vue 实现页面到底自动加载无限滚动且不卡方法 Nginx 配 Let's Encrypt HTTPS 证书 报 错误: 服务器缺少中间证书 问题解决