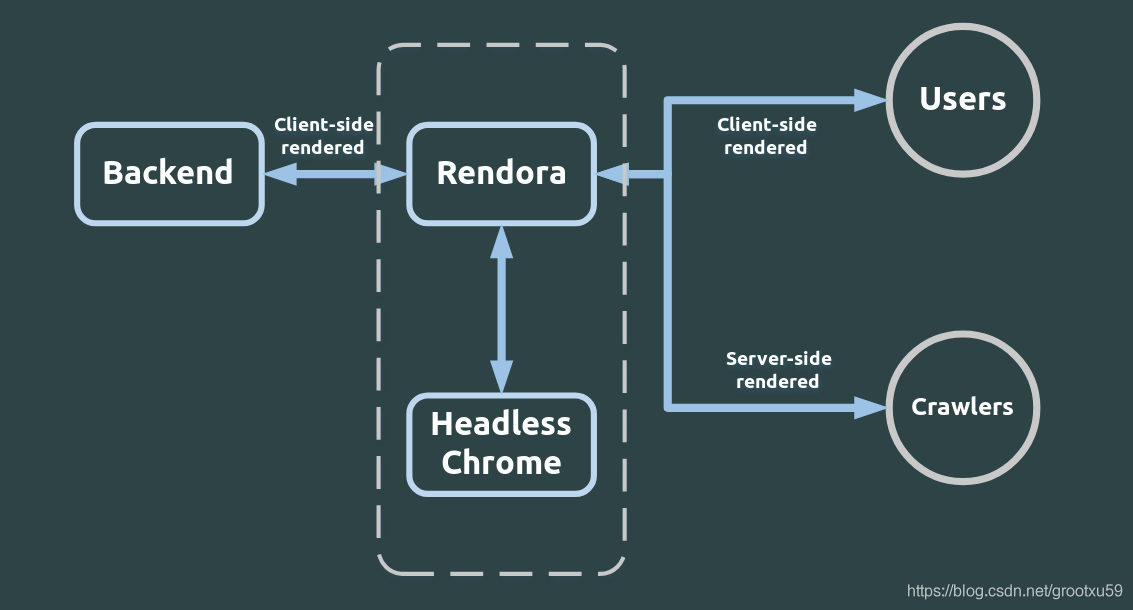
Vue Cli3 SPA 项目 SEO 终极方案 Rendertron 后端渲染 home 编辑时间 2021/02/03  <br><br> ## 前言 **小贴士:前言写的比较啰嗦,而且大部分内容都是个人猜测无证据,如果您不感兴趣,可以跳过,直接看第二段的折腾部分** <br> 先简单概述一下问题,大部分搜索引擎,尤其是百度,特别偏爱静态网站,也就是代码都写在 `index.html` 里,然后最好 `js` 也没有, `css` 也是直接写在 `html` 中,所有内容全部用 `html` 写死。这样的网站呢,百度收录起来非常方便,而且也不容易出现,收录的时候一个样子,用户看到的是另外一个样子的情况。 <br> 以此为契机,即使很多人写的是动态网站(后端渲染),也想尽办法要去假装自己是静态网站,来博搜索引擎的欢心。其中最有代表性的就是 `PHP` 、 `ASP` 、 `JSP` ,非常符合搜索引擎喜欢的样子,把所有内容,动态拼接到HTML里,拼成百度喜欢的样子返回。 <br> 然而显然这样的方式,对于 `SPA` 网站非常不友好。所谓 `SPA` ,即一个空白的 `index.html` 页面,只负责引入 `js` ,而 `js` 中包含海量的代码,来动态生成页面内容,包括动态请求服务端 `API` 接口,多次动态改变页面内容。 <br> `SPA` 网站对用户来说体验是非常好的,效果非常直观,不再是点一下就白屏半分钟。当用户点击按钮后,如果内容已经在前端js的数据中,可以0.001秒刷新出内容,即使前端没有数据,需要请求 `API`,也只要请求需要的部分,相比与整页请求,速度可以加倍,且用户等待时间可以有一个动画过度,不会直接白屏。 <br> 但是对百度等搜索引擎来说,他没有进行多次渲染以达到普通用户最终看到的效果的功能,他一般只会拿到那个空白的index.html页面,当成你网站的最终效果来收录。且只有这一个页面,即使你有千千万万个url,也不会拿到。最终导致搜索引擎收录不了SPA网站的内容。用户也无法从搜索引擎找到你的网站。 <br> 综上所述,为了解决这一问题 我目前找到的最终解决方案为 `Rendertron` 后端渲染 以下图为例,服务端正常用 `nginx` 给到 `rendora` 前端渲染的轻量级代码, `rendora` 会自动识别出访问者是普通用户还是搜索引擎,普通用户直接不做任何处理返回轻量级的前端渲染代码,提高效率,搜索引擎爬虫就返回完整版后端已渲染完成的代码。  <br> 说了这么多 `rendertron` 优点,也要说一个**致命缺点!!!** 回到文章一开始我说百度最怕用爬虫来收录的时候内容是一个样子,用户访问是另外一个样子。那百度也有招,就是他也伪装成正常用户,微服私访,只要他伪装的足够像,我们是无法辨别的,那么他的2个身份不一致,拿到的代码也就不一致。网上流传的说法是,**一旦被发现爬虫和普通用户访问的内容不一致,可能会遭到百度惩罚,排名降级,收录变不通畅等**。到底有没有这回事呢,会有什么后果呢,谁也不得而知了,也许只有百度自家攻城狮知道。**只能说选择这个方案,存在一定的风险,请谨慎选择!切记!切记!切记!** <br><br> ## 折腾 <br> ### 第一部分 安装&调试 `rendertron` 参考 [https://blog.csdn.net/grootxu59/article/details/90453679](https://blog.csdn.net/grootxu59/article/details/90453679) [https://blog.csdn.net/qq_27868061/article/details/109790962](https://blog.csdn.net/qq_27868061/article/details/109790962) [https://www.w7.wiki/develop/4205.html](https://www.w7.wiki/develop/4205.html) [https://github.com/GoogleChrome/rendertron](https://github.com/GoogleChrome/rendertron) 首先是安装 **官方建议安装方法如下** ```shell git clone https://github.com/GoogleChrome/rendertron.git cd rendertron npm install npm run build ``` **可能会遇到的2个问题** 1. github clone 慢或 404 2. npm run build 会自动安装`Chromium` 然而肯定失败,因为缺少依赖 我这里成功的方法如下 首先在自己电脑访问这个地址 [https://github.com/GoogleChrome/rendertron/releases/](https://github.com/GoogleChrome/rendertron/releases/) 目前最新版本是 `3.1.0` , 下载压缩包 Source code , `zip` 还是 `tar.gz` 都可以 看你系统 然后解压获得源码一份,源码手动上传到服务器,我是 `Centos 7.4`, 所以下文以 `centos` 为例 <br> 首先给权限 ```shell sudo chmod -R 777 /root/git/rendertron ``` <br> 然后安装依赖 ```shell npm install npm run build ``` <br> 这里如果按教程启动,肯定会报错,可以试下 ```shell npm run start ``` <br> 我这里的报错信息如下 ```shell > rendertron@3.1.0 start /root/git/rendertron-3.1.0 > node build/rendertron.js Unhandled rejection Error: Failed to launch the browser process! /root/git/rendertron-3.1.0/node_modules/puppeteer/.local-chromium/linux-809590/chrome-linux/chrome: error while loading shared libraries: libatk-1.0.so.0: cannot open shared object file: No such file or directory TROUBLESHOOTING: https://github.com/puppeteer/puppeteer/blob/main/docs/troubleshooting.md at onClose (/root/git/rendertron-3.1.0/node_modules/puppeteer/lib/cjs/puppeteer/node/BrowserRunner.js:193:20) at Interface.<anonymous> (/root/git/rendertron-3.1.0/node_modules/puppeteer/lib/cjs/puppeteer/node/BrowserRunner.js:183:68) at Interface.emit (events.js:327:22) at Interface.close (readline.js:424:8) at Socket.onend (readline.js:202:10) at Socket.emit (events.js:327:22) at endReadableNT (internal/streams/readable.js:1327:12) at processTicksAndRejections (internal/process/task_queues.js:80:21) npm ERR! code ELIFECYCLE npm ERR! errno 1 npm ERR! rendertron@3.1.0 start: `node build/rendertron.js` npm ERR! Exit status 1 npm ERR! npm ERR! Failed at the rendertron@3.1.0 start script. npm ERR! This is probably not a problem with npm. There is likely additional logging output above. npm ERR! A complete log of this run can be found in: npm ERR! /root/.npm/_logs/2021-02-18T07_28_37_294Z-debug.log ``` <br> **这里重点就是说缺少 `libatk-1.0.so.0` 依赖** 一个一个补齐太累了,我百度了所有依赖一次安装的命令 ```shell yum install -y pango.x86_64 libXcomposite.x86_64 libXcursor.x86_64 libXdamage.x86_64 libXext.x86_64 libXi.x86_64 libXtst.x86_64 cups-libs.x86_64 libXScrnSaver.x86_64 libXrandr.x86_64 GConf2.x86_64 alsa-lib.x86_64 atk.x86_64 gtk3.x86_64 ``` <br> 最后再从头跑一次就好了 ```shell npm install npm run build npm run start ``` <br> 如果一切正常应该看到如下信息 ```shell > rendertron@3.1.0 start /root/git/rendertron-3.1.0 > node build/rendertron.js Listening on port 3000 ``` <br> 先按 `Ctrl + C` 退出 <br> 如果还没有装过pm2 现在装一下 ```shell # 安装pm2 npm install pm2 -g ``` <br> 然后用 pm2 后台执行一下 ```shell # 执行前确保你当前位置是在rendertron根目录下 pm2 start build/rendertron.js ``` 返回值如下 ```shell [PM2] Applying action restartProcessId on app [rendertron](ids: [ 1 ]) [PM2] [rendertron](1) ✓ [PM2] Process successfully started ┌─────┬───────────────┬─────────────┬─────────┬─────────┬──────────┬────────┬──────┬───────────┬──────────┬──────────┬──────────┬──────────┐ │ id │ name │ namespace │ version │ mode │ pid │ uptime │ ↺ │ status │ cpu │ mem │ user │ watching │ ├─────┼───────────────┼─────────────┼─────────┼─────────┼──────────┼────────┼──────┼───────────┼──────────┼──────────┼──────────┼──────────┤ │ 0 │ rendertron │ default │ 3.1.0 │ fork │ 20251 │ 0s │ 32 │ online │ 0% │ 10.3mb │ root │ disabled │ └─────┴───────────────┴─────────────┴─────────┴─────────┴──────────┴────────┴──────┴───────────┴──────────┴──────────┴──────────┴──────────┘ ``` <br> 如果和我一样不放心,可以再确认一下状态 ```shell pm2 status ``` 返回值应该是和上面一样,就说明 `rendertron` 作为后台程序正常运行中 ```shell ┌─────┬───────────────┬─────────────┬─────────┬─────────┬──────────┬────────┬──────┬───────────┬──────────┬──────────┬──────────┬──────────┐ │ id │ name │ namespace │ version │ mode │ pid │ uptime │ ↺ │ status │ cpu │ mem │ user │ watching │ ├─────┼───────────────┼─────────────┼─────────┼─────────┼──────────┼────────┼──────┼───────────┼──────────┼──────────┼──────────┼──────────┤ │ 0 │ rendertron │ default │ 3.1.0 │ fork │ 20251 │ 0s │ 32 │ online │ 0% │ 10.3mb │ root │ disabled │ └─────┴───────────────┴─────────────┴─────────┴─────────┴──────────┴────────┴──────┴───────────┴──────────┴──────────┴──────────┴──────────┘ ``` <br> **下一步就非常关键了 尝试使用`rendertron` 请求一个url并进行后台渲染** ```shell curl localhost:3000/render/https://www.baidu.com ``` 正确应该是返回超级长的一段html代码 <br> 那么用了 `rendertron` 代理,和不用的区别是什么呢? ```shell # 不用rendertron 直接请求 curl https://www.baidu.com # 用了rendertron 请求 curl localhost:3000/render/https://www.baidu.com ``` 就是 `rendertron` 会模拟浏览器,进行二次渲染,包括加载所有js css文件,并按浏览器来执行js,js中如果有异步请求接口的,`rendertron` 也会进行请求,并渲染到代码中,最终返回一个渲染好的,百度喜欢的样子的html代码给到前端返回。 <br> ### 第二部分 结合 `nginx` 实现 `seo` 需要注意的是 我的 `vue` 用的是 `history` 模式,所以必须包括以下代码 ```shell underscores_in_headers on; location / { root /xxx/xxx/; try_files $uri $uri/ /index.html; break; } ``` 如果你的是 `hash` 模式,则只需要 ```shell location / { root /xxx/xxx/; break; } ``` **中间的过程,坑也非常多,不过多赘述了,直接上最终成果** ```shell # 关键部分代码 underscores_in_headers on; location / { if ($http_user_agent ~* "googlebot|bingbot|baiduspider") { rewrite ^/(.*) /render/https://$host/$1 break; proxy_pass http://localhost:3000; } root /xxx/xxx/; try_files $uri $uri/ /index.html; break; } ``` ```shell # 通过2段代码测试即可知道效果 curl https://xxx/xxx curl -A 'baiduspider' https://xxx/xxx ``` 如果成功,则第一条命令返回的是 `index.html` 的几行内容,不会执行 `js` ,且速度非常快 第二条命令则会略慢,返回的是大段内容,且是浏览器最终效果的内容 ## END 主线内容到此已结束,还有几个补充内容 **1 sitemap.xml** sitemap是让浏览器知道你的网站有哪些访问路径的最高效的方法,由于是vue项目,动态生成略麻烦 静态方法是可以是在 `vue-cli` 项目的 `public` 目录下,手动创建一个 `sitemap.xml` ,并且手动更新内容 动态方法可以参考我之前的文章 [java springboot 动态生成 sitemap.xml 网站地图](https://zzzmh.cn/single?id=82) **2 标题和描述** 我水平有限,并未找到特别神奇的方案 一个简单的方法就是通过每个页面的js去控制。写在vue-router里则可以统一动态实现。 送人玫瑰,手留余香 赞赏 Wechat Pay Alipay Java 请求读取在线url的 zip压缩包中的内容 无依赖 Linux Ubuntu 20.04 LTS 更新到最新长期支持内核 v5.10.9