Leanote 蚂蚁笔记 自建私人云服务简单流程 Centos 7.4 home 编辑时间 2019/04/09 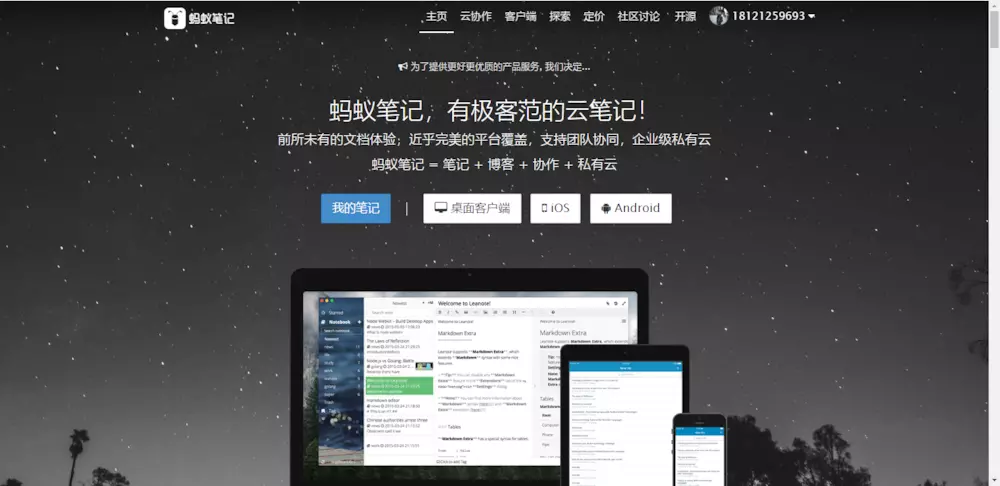 ## 简介 蚂蚁笔记是一款非常非常非常好用的笔记软件,对程序员非常友好,每个功能点都很方便,采用golang & mongodb开发。核心功能除了**笔记**以外,也是个**博客**。他可以把指定笔记,1秒公开成博客,支持自定义主题样式,且自带评论。客户端支持windows 、 mac 、 linux 、 android 、ios等。 ## 正文 先说明一下,正常的蚂蚁笔记用法,是去官方注册一个的账号,然后用官方客户端连官方服务器。 我这里折腾的是另一种玩法,通过官方公开的源码和教程,在自己的centos7的服务器上搭一套go+mongodb环境的蚂蚁笔记私人服务端,并且可以把生成的博客映射到我自己的域名。 客户端方面,登录界面都自带了一个**登录自建服务**入 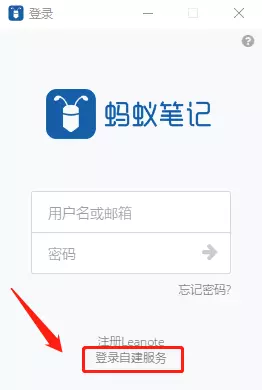 **本篇内容主要讲一下,我折腾自建蚂蚁笔记私有服务端的过程。基于centos7.4**。 ## 准备 首先自己建服务端,得有一个基本款的云主机 + 一个域名 + https证书,如果不会golang没事,但最好学几句mongodb入门。在本文结尾我会贴出一下方便参考的链接。另外服务器最好再做一次nginx反向代理。 ## 一、 基本安装 **所有安装过程都参考的官方教程,地址如下** [官方教程链接](https://github.com/leanote/leanote/wiki/Leanote-%E4%BA%8C%E8%BF%9B%E5%88%B6%E7%89%88%E8%AF%A6%E7%BB%86%E5%AE%89%E8%A3%85%E6%95%99%E7%A8%8B----Mac-and-Linux) ### 1 下载 leanote 二进制版 **说明:由于下载地址不固定,如果在下载这一步失败,可以试试另一个下载方案,先在自己电脑,到http://leanote.org/#download 下载一个最新版,然后自己上传到服务器上,解压。** ```shell # 新建文件夹 leanote mkdir leanote cd leanote # 下载 wget https://nchc.dl.sourceforge.net/project/leanote-bin/2.6.1/leanote-linux-amd64-v2.6.1.bin.tar.gz # 解压 tar -xzvf leanote-linux-amd64-v2.6.1.bin.tar.gz ``` ### 2 安装 mongodb (本方法主要仅针对centos 7的yum方法,安装新版mongodb) 参考:[https://www.cnblogs.com/benjamin77/p/8465394.html](https://www.cnblogs.com/benjamin77/p/8465394.html) ```shell # 新增3.4配置到仓库 vim /etc/yum.repos.d/mongodb-org-3.4.repo #添加以下内容: [mongodb-org-3.4] name=MongoDB Repository baseurl=https://repo.mongodb.org/yum/redhat/$releasever/mongodb-org/3.4/x86_64/ gpgcheck=1 enabled=1 gpgkey=https://www.mongodb.org/static/pgp/server-3.4.asc ``` ```shell # yum安装 yum -y install mongodb-org ``` 到这里就大功告成了,再补上常用命令 ```shell # 启动 systemctl start mongod.service # 停止 systemctl stop mongod.service # 状态 systemctl status mongod.service # 进入mongodb mongo ``` 进入以后的基本操作可以参考mongo入门:[https://www.runoob.com/mongodb/](https://www.runoob.com/mongodb/) ```shell # 例如常用命令 show dbs use [databasename] # databasename填入上一步查出的数据库名称,例如use leanote show collections db.collection.find(); # collection填入上一步查到的collection名称,例如db.users.find(); ``` 个人感觉入门用法上和mysql的思路还是有很多相似的。 ### 3 导入 mongodb 初始数据 官方给的命令如下 ```shell mongorestore -h localhost -d leanote --dir /home/user1/leanote/mongodb_backup/leanote_install_data/ ``` **但这里的地址要根据实际情况更改,参考第一步,解压的位置** 初始化导入以后,可以查看users集合,已经有了2个默认用户 ```shell user1 username: admin, password: abc123 (管理员, 只有该用户才有权管理后台, 请及时修改密码) user2 username: demo@leanote.com, password: demo@leanote.com (仅供体验使用) ``` ### 4 配置 leanote 这段就直接复制官方的说法: `leanote`的配置存储在文件 `conf/app.conf` 中。 请务必修改`app.secret`一项, 在若干个随机位置处,将字符修改成一个其他的值, 否则会有安全隐患! 其它的配置可暂时保持不变, 若需要配置数据库信息, 请参照 [leanote问题汇总](https://github.com/leanote/leanote/wiki/QA)。 ### 5 启动 leanote xxx是指你第一步解压的路径 ```shell cd xxx/leanote/bin bash run.sh ``` 出现以下内容说明成功 ```shell ... TRACE 2013/06/06 15:01:27 watcher.go:72: Watching: /home/life/leanote/bin/src/github.com/leanote/leanote/conf/routes Go to /@tests to run the tests. Listening on :9000... ``` 附上后台执行命令 ```shell nohup bash xxx/leanote/bin/run.sh > logs/leanote.log & ``` ---- ## 二、 进阶配置 到这里,只是搭建了一个全新的私有云笔记。还有很多优化空间,进阶玩法。 ### 1. 备份旧的笔记到新笔记账号。 对 “笔记本” 或 “子笔记本” 右击 - 导出笔记 - 导出Leanote,即可批量导出leanote文件,再去新的账户里,新建笔记本,右击 - 导入笔记 - 导入Leanote,即可。 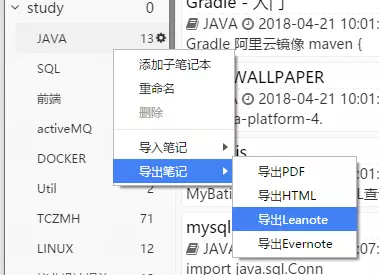 这里我遇到过一个小坑,nginx对客户端上传的文件大小有一定的默认规则限制,导致部分文章附件过大出现502,我通过临时放开nginx的限制来实现旧文章的同步,之后新文章就按照更严格的附件限制来实现就好了。 ### 2. 基本配置 我这里的做法是,让蚂蚁跑在本地的localhost:9000端口上,再用nginx 反向代理到域名的二级域名,最终效果就是https://leanote.zzzmh.cn 我配置过以后的,不同的路径说明 笔记页面 [https://leanote.zzzmh.cn/note/5cab18ba16199b20590004c2](https://leanote.zzzmh.cn/note/5cab18ba16199b20590004c2) 总管理页面 [https://leanote.zzzmh.cn/admin/index](https://leanote.zzzmh.cn/admin/index) 博客 [https://leanote.zzzmh.cn/](https://leanote.zzzmh.cn/) 博客管理 [https://leanote.zzzmh.cn/member](https://leanote.zzzmh.cn/member) 主要后台配置简介看下图 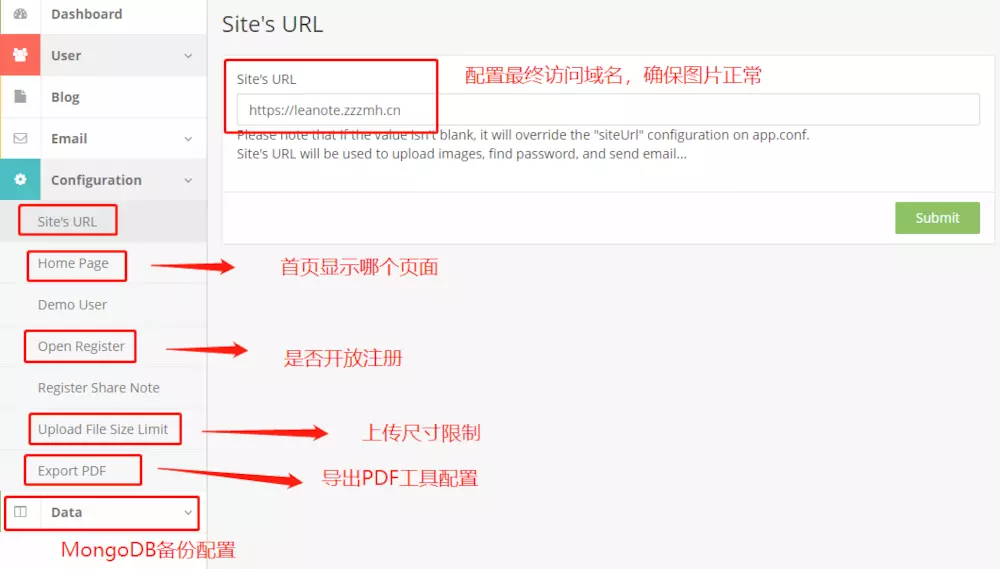 ### 3. 博客主题配置 简单来说,这部分就是,去蚂蚁官方的博客主题设置页面,找第三方主题库,导出ZIP,再打开自己搭的蚂蚁笔记的博客主题设置页面,导入主题。亲测这样子做90%的内容都是可行的,最后就是会缺一些js/css依赖,建议换cdnjs/bootcdn的依赖。 简单说下过程  再到个人私服的博客主题页面,导入ZIP即可。 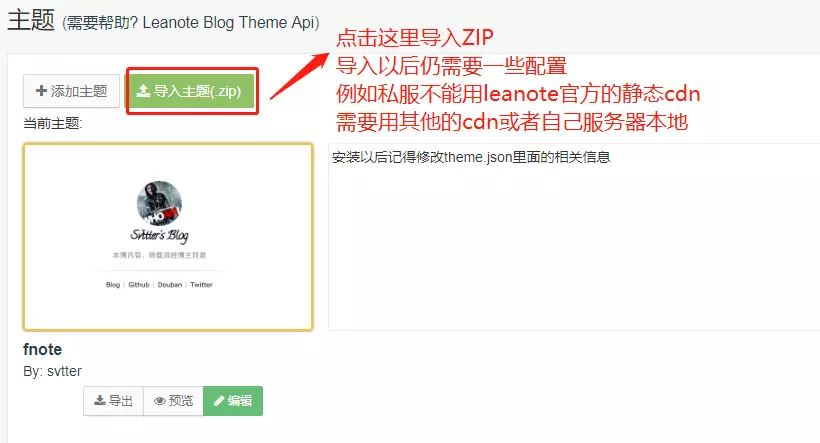 访问 [https://leanote.zzzmh.cn](https://leanote.zzzmh.cn/) 即可看到效果。 ### 4. 博客转PDF 这个部分官方写在设置的说明是这样的 >Leanote use [wkhtmltopdf](http://wkhtmltopdf.org/) to export pdf. You should install it on your server. Please input the path that wkhtmltopdf installed, e.g. `/usr/local/bin/wkhtmltopdf` on mac os/linux or `C:\Program Files\wkhtmltopdf\bin\wkhtmltopdf.exe` on windows. 简单来说,就是去http://wkhtmltopdf.org 官网,下载适合你的服务器系统的安装包,安装以后把文件安装路径配到设置里,就可以实现导出PDF了。我这里测了centos7.4下默认安装路径就是`/usr/local/bin/wkhtmltopdf` 安装命令 ```shell rpm -ivh wkhtmltox-0.12.5-1.centos7.x86_64.rpm ``` 查找命令 ```shell find / -name wkhtmltopdf ``` 最终效果如图,对客户端的笔记`右击` - `导出` - `导出PDF` , 选择保存的路径即可。 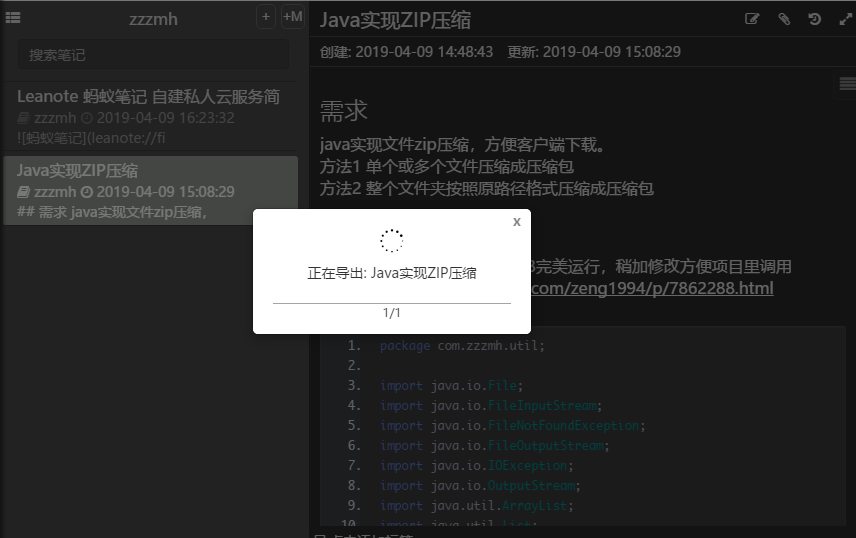 ### 5. 自带备份配置、以及自定义定期备份脚本 如下图,配置mongodb自带的备份和恢复工具的默认路径,centos7.4下默认路径如图是 `/usr/bin/mongodump` 和 `/usr/bin/mongorestore` 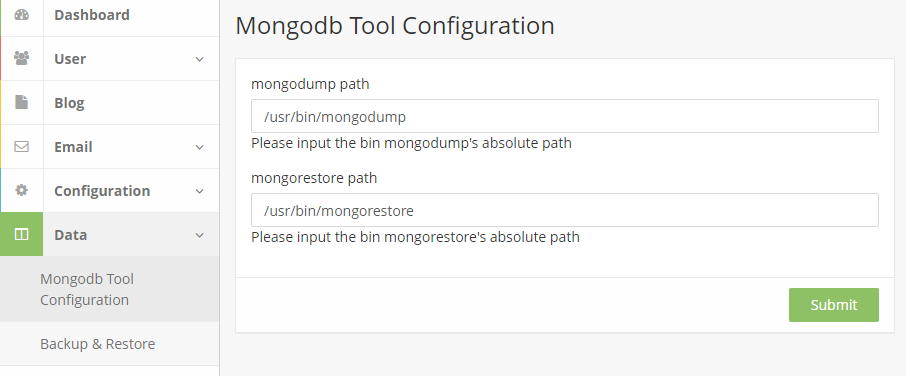 亲测只需要配置完路径,提交,即可实现备份和还原备份,且全程图形化操作。  ### 6. 遗留问题 还是有一些小问题暂时没时间去研究透,等下次有时间再继续精进。 1. 邮箱尚未调通 2. 输出日志功能 3. 静态依赖OSS ## 链接 蚂蚁笔记官网:[https://leanote.com/](https://leanote.com/) 蚂蚁笔记服务端github:[https://github.com/leanote](https://github.com/leanote) 官方安装教程(linux):[https://github.com/leanote/leanote/wiki](https://github.com/leanote/leanote/wiki) ## END 另外欢迎关注一下我的线上网站作品 博客:[https://zzzmh.cn/](https://zzzmh.cn/) 壁纸:[https://bz.zzzmh.cn/](https://bz.zzzmh.cn/) 插件:[https://chrome.zzzmh.cn/](https://chrome.zzzmh.cn/) 笔记:[https://leanote.zzzmh.cn/](https://leanote.zzzmh.cn/) 送人玫瑰,手留余香 赞赏 Wechat Pay Alipay Nginx Tomcat 实现图片防盗链 解决404等 Java实现ZIP压缩